
The basic process to create and run a virtual machine (VM) is very straightforward. Just about anyone can do it. Having said that, to leverage the performance of advanced VM operations, technical skills are required.
While the processes of creating and configuring VMs varies slightly depending on what hypervisor or VM provider you are using, the general steps involved are the same for all solutions.
This guide does not provide specific instructions that apply to all operating systems, different hypervisors and VM vendors´ features. Instead it presents a general guide that can serve as a blueprint no matter what VM technology you are using.
4 simple steps to set up and run a virtual machine
The basic steps to set up a VM are: (1) check system support; (2) install a hypervisor; (3) create your VM; (4) run basic operations on your VM. Let’s go through each of those in some more detail:
Step 1: Check virtualization support and necessary resources
The first thing you need to do before creating a VM is to make sure that the computer or device where you will create and manage the VM has the necessary resources and supports virtualization. This means looking into:
- Administrative privileges: Installing hypervisors, the specialized software used to create and run VMs, requires administrative privileges in almost every case (with rare exceptions). Make sure you have those privileges before starting the process.
- Sufficient resources: Virtualization requires a certain amount of RAM to run smoothly and a certain amount of disk space. The computing resources demanded by VM will depend on several factors, such as the OS and its operational needs.
- Hardware virtualization support: Another key feature is virtualization support. This comes built into your computer OS and is known as “hardware virtualization” or “virtualization extensions.”
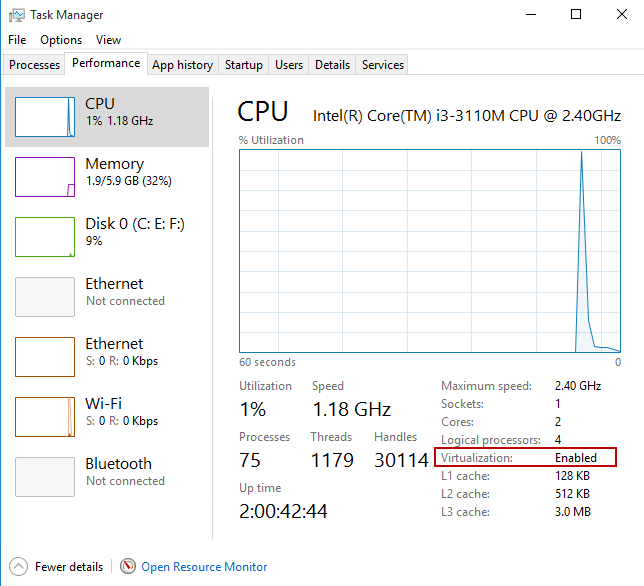
You can rapidly check if your computer supports virtualization by looking for the VT-x or AMD-V feature in your settings. In Windows, you can do this using following these steps:
1. Open the Task Manager.
2. Go to the Performance tab.
3. At the bottom right, check if Virtualization is shown as enabled (Figure A).
If virtualization is disabled, you will have to manually enable it through the BIOS. This process varies depending on your OS and its version. The Windows 11 instructions to enable virtualization can be found here.
Step 2: Choose, download, and install a hypervisor
Now that you know your computer has everything you need to run a VM, you can download a hypervisor to create and manage it.
There are many excellent hypervisor providers online. Each has its own approach to VMs, strength, ease of use, support, features and resources.
The most popular VMs in the market are:
- VMware vSphere: Best for large enterprises and cloud providers. Available for Windows, macOS, and Linux. It is a powerful hypervisor but can be expensive.
- Microsoft Azure Virtual Machines: Based on the company’s Hyper-V hypervisor, included in Windows 10 and Windows Server, it is a good choice for users who are running Windows and are familiar with Microsoft products.
- Citrix Hypervisor: Known for its robust virtual desktop and application deployment features, ease of use, and modern approach, Citrix is popular among companies that deploy VM on a large scale.
- Red Hat Hypervisor: A go-to Linux-based hypervisor. Powerful, rich in features, scalable, and easy to manage. The hypervisor integrates seamlessly with Red Hat solutions.
- Oracle VM VirtualBox: VirtualBox can be accessed in two different versions: a free version and a paid enterprise plan. VirtualBox is an open-source hypervisor that runs on Windows, macOS, and Linux. It is good for beginners and advanced users alike.
Downloading and installing a hypervisor will also vary depending on the company providing the solution, but in most cases, it’s a very simple process that can be completed in a few steps, just like installing any other software.
Step 3: Create your virtual machine
Once again, this step will vary slightly depending on the vendor, but in general terms, the process of creating a VM is the same for all. It’s important to note that once you go through the steps to create a VM, your computer or device might take some time to execute the processes. This will depend on your computing power.
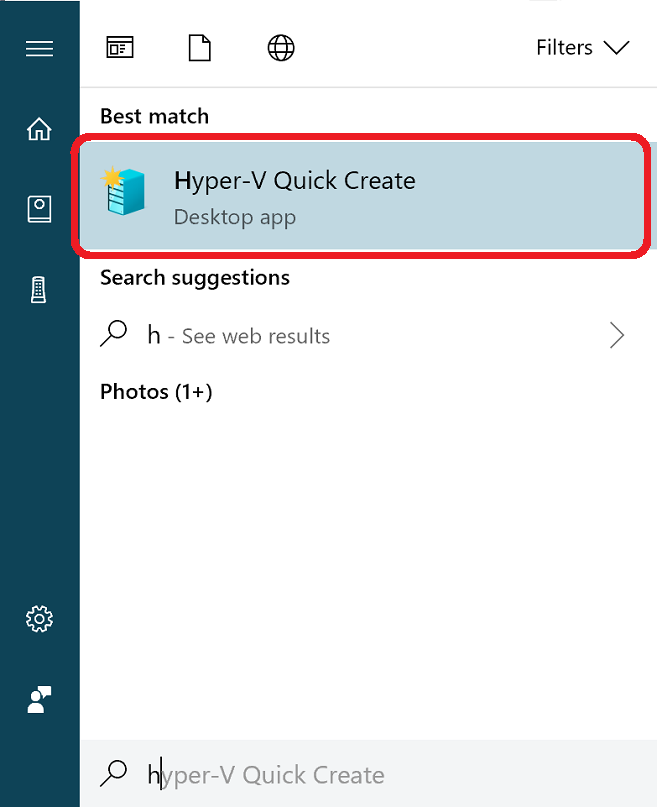
Once your chosen hypervisor is installed, follow these steps to create or start up a VM:
- Open the hypervisor.
- Click on “Create” (Figure B).
Note: The order of the following steps may vary.
- Enter the name of your new VM.
- Set up the basic configuration, RAM, disk space, network, etc.
- Select the type of OS you want to install (Figure C).
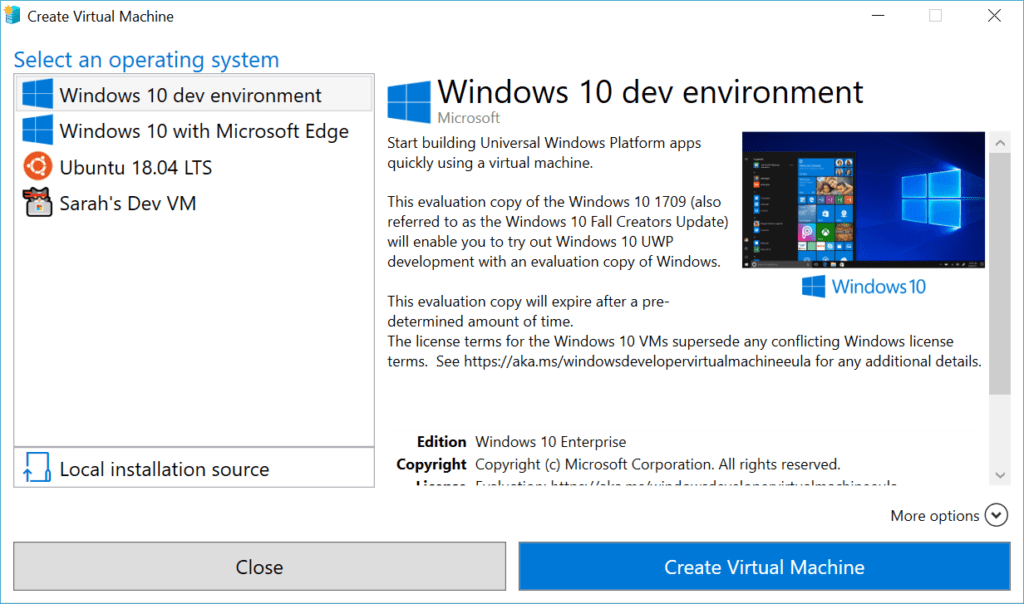
- Confirm the operation by clicking “Create Virtual Machine.”
When selecting the OS for your VM, you will be given the option to use your own OS image and change the installation source for the OS.
Step 4: Run basic operations on your virtual machine
Once you have configured and created your VM, you can start operating it. There are endless possibilities for what you can do on a VM. There are, however, some basic features to cover.
- Starting and stopping the VM: This is the most basic feature. To start a VM, open the hypervisor and select the VM from the main user interface, then click on “Start.” To stop a VM, select the VM and click “Stop.”
- Suspend and resume the VM: You can also suspend the VM, automatically saving it to disk to later resume work. When the VM is resumed, it will be open in the same state it was in when it was suspended. The location of the suspend/pause and resume/restart VM buttons varies depending on what hypervisor you are using.
- VM snapshots: You can take a snapshot of a VM at any time. A snapshot is a copy of a specific point in time of your VM. Snapshots allow users to revert the VM to the exact state of the snapshot, useful for when something goes wrong.
- Migrating VMs: Moving a VM from one computer, device, or data center to another is common. Once your VM is created, you can leverage this feature for recovery and backup, performance, or load balancing purposes.
- Managing your VM’s resources and configurations: While resources such as RAM, CPU, disk space, and network settings are configured when you first create a VM, you can also modify them later. Using the hypervisor’s user interface, you can reassign resources and configurations to increase performance, troubleshoot errors, and enhance privacy and security.
Bottom line: Deploying your own VM
VMs are heavily used by all types of industries. Data centers and enterprises use them to better manage resources, consolidate systems, and increase security. Developers and engineers use VMs to develop and test in controlled, isolated environments before releasing them to production. Organizations also use VMs to run legacy operating systems, leverage features across different OSs, experiment, and innovate.
Setting up and running a VM is not as complex as many people think. And while the most sophisticated operations do require advanced knowledge, anyone can start their virtualization journey by building and managing their own VM.
If you’re going to be using a VM regularly or for business critical processes, make sure you have one of the best VM backup software available to protect your data from loss or damage.
