Microsoft has invested a ton of time and money getting Windows Server 2012 to the finish line. The sheer number of new and improved features makes it challenging to cover them all in any level of detail. This review will attempt to highlight the most important new features and delve a little deeper into those that matter most.
Design principles for Windows Server 2012 were driven by the three key themes of continuous availability, cost efficiency and management efficiency. It’s easy to see how these design principles drove many different parts of the operating system from the new Server Manager and  its polished graphical user interface (GUI) to SMB 3.0 and the huge number of improvements to the file system.
Setup and Configuration
One of the first things you see at installation is the option to install either Windows Server 2012 with or without a GUI (see Figure 1 below). The GUI-less option is called Server Core and is Microsoft’s preferred method for any server that won’t have a human sitting in front of it. The idea here is to trim down the surface area that could make the server less secure and control it remotely with the new management tools. You can switch between the two installation types with a single PowerShell command:
Install-WindowsFeature Server-Gui-Mgmt-Infra,Server-Gui-Shell –Restart
This will require a system restart, but once that’s complete you should have the full GUI plus the Server Manager tool installed. If you have a system configured the way you want and you wish to remove the GUI tools, you could use the following PowerShell command: 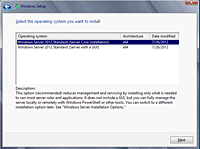
Uninstall-WindowsFeature Server-Gui-Mgmt-Infra -Restart
If you choose the GUI option, you’ll have what looks like a Windows 8 system with a few added icons. Once the installation completes and the system reboots you’ll see the new Server Manager tool, as it will start by default. From there you have the ability to do the initial machine configuration, such as set the server name, change the time zone, connect to a domain and other housekeeping steps.
The base install only loads a few minimal services to get the system up and running. To add additional roles and services you must use the Server Manager tool or PowerShell. PowerShell also provides the remoting functionality necessary to execute commands on any server on the network.
You must enable the remote management capability on each server you wish to control.  This is an option available on the Local Server page of the Server Manager GUI (see Figure 2). It is enabled by default and will require domain administrator credentials to make any modifications on a remote machine.
If that’s not enough, there’s also a PowerShell Web Access gateway for connecting to remote machines using any Web browser. This would be really handy for times when you don’t have access to a machine with VPN or direct access and need to make some type of administrator changes.